Is machine embroidery for you?

If you love to create with sewing patterns, then chances are you’ll love machine embroidery.  With an embroidery machine and few machine embroidery designs, you can embellish all of your projects to make them unique.  The best part is the embroidery machine does all the work for you!  It is so fun to show friends how an embroidery machine works for the first time.  As soon as that machine starts stitching out the design, their jaw just drops and then the excitement starts!  It really is fascinating to watch.

Many YCMT fans enjoy adding appliques to their projects.  Did you know embroidery machines can do appliques too?  You simply download an applique embroidery design and let the machine to do all the work for you!

To learn more about getting started with machine embroidery, visit SWAKembroidery.com!  SWAKembroidery.com is a sister site to YouCanMakeThis.com and owned by the same people.  So, you can be assured your experience there will be as great as it is at YCMT!

Leave a comment

Filed under Uncategorized

We have a NEW blog — Please come on over!

We have a new blog and I’d love for you to come and visit! Be sure to bookmark the new url and visit often. If it is something that can be MADE, we’ll probably be blogging about it! 🙂 

If you are sewing along with the “Make-It-Up-As-You-Go-Along” Quilt, I’ll be posting new steps to finish the quilt over on our new blog. We’ll keep this blog up so that everyone can catch up on these earlier steps.

Can’t wait to “see” you over there!

-Kim

4 Comments

Filed under Fun News!, Make-It-Up-As-You-Go Quilt

Post here if you’re sewing along…

I’m so excited to see what you all are doing! If you have a blog, or just want to let us know that you’re still sewing this quilt, make a comment. We’re almost done so this is where it gets really fun!!

Photobucket

59 Comments

Filed under Make-It-Up-As-You-Go Quilt, YCMT Sew Along

Part 9: Adding those corner triangles!

Ready for part 9? If you are just checking into the blog today, don’t forget to see my Super SEW Sunday post where I described part 8.   These were 2 simple steps so I decided to post them on the same day.

Step 1:  Cut your fabric into two, 5.5 x 5.5″ squares.  If you’d like to have all four corners from a different fabric, simply cut these from four different fabrics.  Again, there are math formulas for exact cuts, but I just look at what my main block is and decrease the size by 1/2 inch.  Since I had 6″ blocks, I cut these new blocks for the corners as a 5.5 x 5.5″ square.

Step 2:  Lay your ruler from one corner to the next and make a diagonal cut. Photobucket

 Photobucket

Step 3:  Take one of your triangles over to the ironing board.

 Photobucket

 Step 4:  Fold triangle in half and press. You want to see a visible crease down the center. This helps with your placement in step 5.

Photobucket

Photobucket

Step 5:  Right sides together, place triangle on top of one of the corners of your quilt.  Pin.  The crease you made in step 4 will help you to match the center with the center seam in the pinwheel.  **Note: Your triangle will be larger than the quilt block. This is ok! You’ll trim it later. 😉

Photobucket

Step 6: Using a 1/4″ seam allowance, sew corner triangle to quilt. Repeat steps for the other 3 corners. Press all seams on all 4 corners.

Step 7: Square up and trim all excess fabric.

Photobucket

Photobucket

You are done with the center portion of the quilt top! WOW! What do you think? Do you love what you are doing? I hope you’ve had fun!

Photobucket

We still have 2 borders to put on the quilt and then the quilt top will be finished. I made this a small lap quilt since it will just go over the corner of my bench.  It is also a good size for a baby quilt or  a wall hanging. But these techniques are perfect for making any size quilt!

Have fun!!
-Kim

12 Comments

Filed under Make-It-Up-As-You-Go Quilt, YCMT Sew Along

Super Sew Sunday & Part 8…

I hope you all had a nice weekend! I’m guessing many of you got out the chips, dip, and grill for a Super SEW Sunday! Am I right? 🙂 What?!? You think I mean, “Super BOWL Sunday?” Nahhh….I mean, I *think* I heard “something” about tackles, interceptions, a neat story about a guy by the name of Kurt Warner, maybe some “Steelers” talk and all…

LOL! Just kidding, of course!  So while Super Bowl Sunday was happening around here, I did sneak off for a little super-sewing, too. 😉

Part 8 & 9 will go by really fast. So let’s start with part 8: sewing those rows together! 

Step 1: Arrange your diagonal rows as I have done in the photo below. The numbers just help with step 2.

Photobucket

Step 2: Right sides together, line up the bottom of row 1, to the top of row 2.

Photobucket

Step 3: Pin rows together. Carefully match up seams and use a lot of pins. 🙂

Photobucket

Step 4: Using a 1/4″ seam allowance, sew row 1 to row 2.  Continue sewing rows together by sewing row 2 to row 3, and so on. Repeat until all 5 rows are sewn together. Press seams.

Photobucket

In keeping with the idea of making this quilt in “baby steps,” I’ll wait a few hours until posting the instructions for the corners. Resist the temptation to trim your quilt just yet. 🙂 It’s ok if you have, but we’ll take care of it all in one big step when we put on those corners.

I’ll post again later on today! Have fun!!

-Kim

4 Comments

Filed under Make-It-Up-As-You-Go Quilt, YCMT Sew Along

Part 7 — I Think You’ll Like This One!

I wanted to wait a few extra days before posting this in order to give everyone time to catch up. I’ve been visiting your blogs and your quilts are looking GREAT!! 

The last step wasn’t the most fun, but this one sure is! 

As you know, I’m making this up as I go. So my initial idea was to have the center of the quilt, created in this way: 4 pinwheels across, and 4 pinwheels down.  So you’d have a 16-pinwheel quilt center. Something like this:

Photobucket

Do I like that? Sure! It works. It’s cute. It’s “Option 1.”  And if you’d like to go ahead and sew those rows together, then you’re ready to go there and do that step.  And it will be adorable. 

But before you do….let me show you “Option 2.”  (heehee) This option was one that I fell in love with once I turned my squares “on point.”  See the difference this makes?

Photobucket

Now you may notice something right away — Option 2 only has 13 pinwheels. I had you make 16 pinwheels since I was first going to go with option 1.  So if you are going with Option 2, choose your favorite 13 blocks and keep the extra 3 for pillows, other quilts, etc. 😉

This tutorial is going to be a little longer, but I’m telling ya…IT WILL BE FUN!! 🙂  (Plus, you just may learn something new, too!)  Again, the following steps are for OPTION 2 ONLY.

Notice how there are missing triangles? No worries! I’ll show you how to put those in there.  There’s a little trick to it,  so you’ll want to follow closely so that your quilt top lays nicely.  PART 7 will only show you how to do those SIDE TRIANGLES.  The corner triangles will come in Part 8. 😉

Photobucket

Step 1:  Cut 2, 9×9 inch squares.  I based the 9×9 inch measurement on the fact that my pinwheels finished as a 6 inch square. So if your finished square is 5 inches, cut 8×8 inch squares.  There are many fancy math formulas out there for getting an exact size for cutting your side  triangles, but I’m going to follow the advice of Rochelle from Cottage Quilts and simply add 3 inches to my finished block.

Photobucket

Step 2: You’ll be cutting 4 triangles out of this 9×9 inch square. Confused? Don’t be. Here’s what you do: With your ruler and rotary cutter, cut across at a diagonal.
 Photobucket

Step 3: Cut across along the other diagonal.

Photobucket

Photobucket

Since your bias cuts are on the inside of the square, making your cuts like this prevents the border of your quilt from becoming “wavy.” Now you have 4 triangles that you can place on the sides of your quilt.  Cutting your 2nd, 9×9″ square will give you 4 more triangles.

Step 4:  Place your triangles along each side.  The long side of the triangle will be on the outside border.  *Note: If you want a more “scrappy” looking quilt, simply cut more 9×9 inch squares. You’ll have a few extra triangles that you won’t need, but you’ll get the amount of different fabric triangles you want. 

Photobucket

Remember, don’t worry about those corner triangles right now. Those are cut differently and we’ll do that on another day. 🙂

Photobucket

Step 5:   Now you’re going to sew these “diagonal” rows. Starting in the top left-hand corner, sew triangle 1 to block 2. Then sew block 2 to triangle 3.  Use a 1/4 inch seam allowance.  The photos below will help you “see” what is happening.

Photobucket Photobucket Photobucket

Photobucket

Step 6:  Press your seams towards each triangle.

Photobucket

Step 7:  Repeat steps 5 & 6 for the rest of the diagonal rows.  Example:

Photobucket

Photobucket

OK, that’s all for today! Part 8 will include how to sew the rows together and adding on your corner triangles! Have fun! I’ll be watching for your updates!

Photobucket

17 Comments

Filed under Make-It-Up-As-You-Go Quilt, YCMT Sew Along

We Need Your Help….

Help “YouCanMakeThis.com”
Become Recognized as
One of America’s Top Mom-Owned Businesses!

Our site has the opportunity to become one of America’s Top Mom-Owned Businesses and I need your help. StartUp Nation is sponsoring this kind of recognition and I’m grateful for the chance to be a part of it.

It’s hard to believe what has happened over the last 2 1/2 years. What began as a small idea became something that has helped over 200 women become authors, and thousands of you have been able to make things you may have not thought possible. Trying to “juggle” a business and motherhood has its challenges, but it has been an amazing ride, as well.

If YCMT has enriched your life as an author, a customer, or in any other small way, we would appreciate your vote. You can vote for us once each day from now until April. To read more about our story and place your vote, click the button below.

Vote For Us in the StartupNation Leading Moms in Business Competition

15 Comments

Filed under Fun News!

Part 6 – Time to “Square Up!” Again…

Photobucket

It has been fun visiting your blogs! I’m still working through getting to all of them, but from what I have seen so far, your blocks are looking fantastic!  I spent some time squaring up my blocks again — this time to 6″ square blocks. You can choose whatever size you’d like, as long as they are square.  If you missed the first time we squared up our smaller blocks, here’s a quick tutorial.

Now remember how I said this was a “Make-It-Up-As-I-Go-Along-Quilt?”  Well, I wasn’t kidding – lol –  and now I’m trying to decide which of the 2 ideas I have will be the one I go with.  Hmmm….decisions, decisions…..

In the meantime, let’s square up those blocks and I promise to be ready really soon with the next step! Have fun!

-Kim

I did say this would be a VERY scrappy quilt, right? Check out those fabrics — no rhyme or reason…just pure cuteness from the stash! 🙂 But I already have some ideas of some color schemes I want to do next… 🙂

Photobucket

27 Comments

Filed under Make-It-Up-As-You-Go Quilt, YCMT Sew Along

Part 5 — It’s Coming Together Now!

*I made 2 new posts today so make sure you read “Part 4”.

So you’ve made your half-square triangles, and are ready for the next step, right? I know some of you are so I’ll go ahead and post what I’ve done next.  In fact, I’m still sewing these together.  I love seeing the fabric combos!

The pinwheel block is one of my very favorites. It’s easy and oh, so cute. These blocks will be the center focus of the quilt.

Step 1: Lay your half-square triangles in front of you as shown in photo:

Photobucket

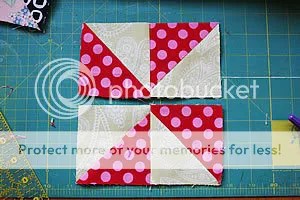
Step 2: Take the fabric on the right of the photo and place it over the top of the fabrics on the left side of the photo. Simply put: your right sides of each fabric block are facing.

Photobucket

Step 3:  Using a 1/4 inch seam allowance, sew the first block set together along the right-hand side.  Repeat for the 2nd block set. (Red dashed-lines indicate where you are sewing.)

Photobucket

Step 4:  Open and press your seams with iron. Press on both sides of this new block.

Photobucket

Step 5: Right sides together, sew your top block to the bottom block.

Photobucket

Congratulations! You’ve now made a pinwheel block! It is so fun to see the colors come together. You’re going to love this part. Remember, practice makes ALMOST perfect. I’ve never made a PERFECT quilt but I love each one. Enjoy the process, learn from it, and have fun.

Keep sewing! I’ve got to sew the rest of my blocks over the next few days so we can move on. I have some ideas for what I want to add to it next, but I’ll let you know how those come as I get there. You may have some ideas, too!

Oh, and if you’d like to tell your friends about what you are doing and invite them to join in, here’s a button you could place on your blog, or other online areas. Link them back to the YCMT blog post so they know the steps and how to get started.

Photobucket

Joining in a little late? No problem! Here’s what you’ll want to do:

Part 1: How it all started and how many square to cut!
Part 2: How to make a half-square triangle
Part 3: Ironing your blocks

Part 4: How to square-up your half-square triangles

25 Comments

Filed under Make-It-Up-As-You-Go Quilt, YCMT Sew Along

Part 4 – OK, so it’s not “perfect”….

…and yes, that is way-OK!  Because I’m going to show you something that will help a lot.  I should have combined this technique with the last section of part 3, but that’s ok. It’s not too late. And then I PROMISE we’ll move onto the fun stuff of combining blocks.

I’m going to show you how to “square up” your blocks.  Despite our best intentions to make each half-square triangle the exact same size as another, there will always be times when the fabric either stretches a bit more than another block, the seam isn’t “exactly” 1/4 inch, our pressing didn’t make things exact, etc. etc. Rather than dwell on that, let’s think about the good news here.

You can “square up” a block and make each one look like the other.  It may seem tedious at first, but it goes by fast and it is well worth the time in doing that so that everything lines up like it should.

OK, so here’s a quick run-down on what can happen. Exhibit A: Kim (yes, I’m talking now in 3rd person) stays up late and is sooooo tired. She decides that rather than go to bed like a normal person, she gets the sewing bug and wants to work on some of her half-square triangles.  She knows where to sew, she keeps her eye on the 1/4 inch seam, and somehow she strays…from that 1/4 inch seam.  Before she knows it, blocks look a tad funny. They don’t match up with one another. But no worries Kim! You’ve got a solution — you “square up” that beauty of a square and MAKE it match.

OK, back to reality here and forget the silliness — This WILL happen to you, too. (And even when you are well-rested! :))  So here’s what you do.  Place your square underneath a square ruler.  I want my squares to be 3 1/2 inches at this point. Notice it is NOT 3 1/2 inches. Oops.

Step 1: Place your square underneath a square ruler. The dashed lines show where that 3 1/2 inch square should be. The nice big red arrows show some problem spots. (eek.) But remember….it’s all good! No-stress project here.


Step 2:  Make sure your diagonal on the ruler (45 degree line) is on the diagonal of the half-square triangle.  Before you trim, make sure the fabric on the left and bottom sides extends just a tad over the 3 1/2 inch line. This is ok because you’ll cut it off later. 

Step 3:  Trim the right  and top edge of the half-square triangle.

Step 4:  Lift the square ruler off the fabric and rotate your fabric arounds so that you can now trim off those 2 other sides.  This time make certain that your bottom and left side of the square lines, lines up right along the 3 1/2 inch markings. 

Step 5:  Trim any fabric that extends beyond the ruler.

Now you’ve got a perfect square! Isn’t she a beauty? 🙂  And if you’ve never done this before, you learned something new!  You can use this technique with ANY size you are making. I know some of you are making 5 inch squares while another is making 2 inch. No problem at all.

Are you ready to go to the next step? I’ll go ahead and post it for those who are speedy and anxious to see it all come together. We are making one of my very favorite quilt blocks – a pinwheel!  Keep reading…

11 Comments

Filed under Make-It-Up-As-You-Go Quilt, YCMT Sew Along